Monday, February 15, 2010
1/2 Ragged.....
Sunday, February 14, 2010
Rag Bag Bandwagon


Terry's Valentine

Monday, February 8, 2010
Flower Pot Box Directions

Friday, February 5, 2010
Why You Should Bring a Friend....
First of all, it's the most fun you will EVER have!
Second, there is always chocolate--no one should stamp without it!
Best of all, there's always Stampin' Friends!
And if you bring along one of your Stampin' Friends to my workshop not only will you receive a bag of goodies so will she!
See? I told you there's CHOCOLATE!!! :)
Each bag has 2 3"x3" cards with matching envelopes, 3 Hershey's Nuggets and 1 coupon for 10% off your order that day. To top it off, I added a piece of Stampin' Up!'s beautiful grosgrain ribbon to tie the cello bag. I love ribbon almost as much as chocolate, don't you?!
Now how can you go wrong attending a Stampin' Up!© Workshop and bringing your BFF along?!

Project Recipe:
Stamp Set: Vintage Vogue
Cardstock: Regal Rose, Bashful Blue, Certainly Celery and Whisper White
Ink: Bashful Blue, Certainly Celery (Coupons are printed off the computer)
Accessories: Ribbon, Cello Bags, dimensionals, silver brads
Wednesday, February 3, 2010
Blue Flowers
I made these for my workshop on Saturday. There are two things I know for sure about my Hostess. She loved flowers and the color blue. I think she will go absolutely crazy when she sees these cards. :)
Thank you, Elizabeth Harris for the inspiration! You rock...

A Little Treat Bag w/ a handful of kisses inside:

Love is in the Air....
These cards were inspired by Vicki and Ilina.
They are both changed up from the originals--sometimes I am a creative CASEr. *snicker*

Tuesday, February 2, 2010
For My Hostess
Bring A Friend
Card Recipe:
Stamps: Vintage Vogue
Cardstock: Whisper White and Bashful Blue
Ink: Regal Rose
Stampin' Write Marker: Certainly Celery
Accessories: Paper Piercing Tool, Mat Pack and Dimensionals
Monday, February 1, 2010
Thinking Spring
Now if I could just make it 70 degrees outside. LOL

Card Recipe:
Stamps: Well Scripted, Inspired by Nature
Ink: Old Olive
Cardstock: Rich Razzleberry, Old Olive and Whisper White
DSP: Cottage Wall, Rich Razzleberry
Accessories: Wide Oval Punch, Scallop Trim Punch, Lot of Tags Die, SU! Perfect Polka Dots Textured Impressions Folder, Butterfly Punch, Linen Thread
Saturday, January 30, 2010
Flower Pot Box
Good Saturday Morning, the sun is up in Wisconsin and as promised I took some pictures of my latest project to show you. I need hostess gifts for a couple upcoming workshops and I couldn't think of quicker or cuter gift than a little box full of these 3" x 6" cards made with the CUTE Sweet Pea DSP Stack in the Occasions Mini . There isn't a single sheet in the whole stack that I can't think of a use for as a cardmaker. :)
These 2 are my absolute favorites:
They use the backside of the flower dsp as a border across the bottom of the card--yep the backside is as cute as the front!

It took me a little time to figure out the little Flower Box for the cards, but I'm pretty happy with the results. :) This little box is bigger than the Birds' Nest I made a couple days ago--I wanted to fit the SU! envelopes and an RSVP pen in to give as a gift set. This little box is 3 1/2" wide x 1 1/2" deep. I love the matching Sweet Pea felt flowers on the front of the box. They are so stinkin' cute! The colors are so bright--I can't help but smile.
Wouldn't it look cute on your desk?

Gift Set Recipe:
Cardstock: Red Rose, Old Olive, Pumpkin Pie
DSP: Sweet Pea (Occasions Mini)
Stamps: Teeny Tiny Wishes
Accessories: Sticky Strip, Bone Folder, Sweet Pea felt, glue dots, Always Artichoke grosgrain, word window punch, modern label punch and eyelet border punch
Wednesday, January 27, 2010
Sweet Treat Top Note Holder Step-by-Step
Here we go...
(be kind this is the first Step-by-Step I have ever done)
Step 1: Cut out 2 cardstock Top Notes and 1 DSP Top Note.
Note: Notice that the Top Note is not the same on top and bottom. The points are different--make sure you have matching points on the top and bottom so when it comes time to assemble it will match up. (The voice of experience...LOL)


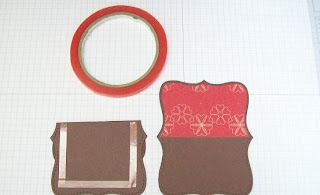
Step 8: Using Sticky Strip make a pouch.

Step 9: Assemble. I squeeze the sides a bit and stick my hand down in the pouch to form a pocket so the candy will fit better in there. It's pretty tight and needs to be 'worked over' a bit. :)
Step 10: Decorate. :)
Recipe:
Stamps: Love Bandit (Occasions Mini)
Cardstock: Chocolate Chip, Real Red, Whisper White
Ink: Close to Cocoa, Chocolate Chip
DSP: Sending Love Specialty
Accessories: Sticky Strip, 1 1/4" and 1 3/8" circle punches, modern label punch, word window punch, heart to heart punch, dimensionals, white grosgrain ribbon, aquawriter.