Tuesday, May 31, 2011

Just Peachy

The graduation is over!  Dani has a signed diploma and her party was a hit so all is well at the Hawkinson house.   The graduation was nice.  Dani gave a good speech--not too long, not too short.  Her classmates giggled and laughed out loud at some of the memories of their years together.  I was touched by the support of her classmates knowing that Dani was scared to death of getting up in front of everyone at graduation.  There were lots of smiles and encouraging glances and high fives and pats when she returned to her seat.

 The weather Saturday wasn't hot, cold or raining so I was excited that our guests could be outdoors and not confined to the house.  We had a great turn out.  It was nice to see old friends and family come out to celebrate with us. Dani did great.  She is not a social butterfly by any means, but she conversed and made small talk like a champ!  :)  We have been cleaning up from our party and attending 6 other parties this weekend.  So needless to say, there has been very little time for stamping.  I actually opted for going to bed early instead of stamping last night.  Ohhhh say it isn't so!!  LOL

I did take a few minutes this afternoon while Evan napped to stamp a card for Krista's Cards & Things Challenge this week.  It's a bright color challenge.  Just right for spring!


I  mounted my little Hello, Blossoms a la carte stamp just to ink it up for this card.  It's in the mid 80s today.  It feels like a bright cheery flower kinda day.   I think this card would brighten anyone's day....  it's just peachy!  LOL


Wednesday, May 25, 2011

Scrapbook Contest

It is going to be extremely busy between now and Sunday morning preparing graduation food and having Dani's party on Saturday.  I haven't forgotten about the graduation card or the watercoloring tutorial. I promise that when I get a couple minutes I will work on getting them made and added to my blog. 

Createforless on Facebook is having a scrapbook contest.  I added 3 of my MDS layouts to the contest.  I am extremely happy that I have a few likes since I don't really consider myself a scrapbooker.
If you would like to go and vote for Evan's layouts, please do.  Here's the link to Createforless.  You have to 'LIKE' Create for Less before you can vote.

The Greatest Gift and A Child's Eyes are doing pretty well....
The Fundamental Gifts is....well....doing..  LOL


Tuesday, May 24, 2011

Love & Care

Good morning, posting quickly this morning before Evan's speech therapist arrives.  I love early morning appointments. *groan* Although today, I'm pretty excited.  Evan has refused to sign for milk, cup or thirsty. Pulling you by the finger to the kitchen and standing in front of the cupboard w/ the cups and screaming was his way to get a drink. Signing milk is a HUGE improvement.  As he gains signs, our life and his gets so much easier.  I know his therapist will be thrilled when I tell her.  I'm not holding my breath that Evan will show her.  He is 2--he does things in his time not ours!  LOL

 Krista's got a brand new challenge up over at Cards & Things.  If you love the purples this is the challenge for you.  Go over and play along!  :)


Here's my card for this week.  I used the new Level 2 hostess set, Love & Care,  from the Summer Mini.  I have a special recipient in mind for it.  A sweet lady from our church is turning 99 on June 2.  We are going to shower her with cards.  99  years of good health is something to celebrate!


How do you know when you officially live OFF the beaten path? When you need to use MDS to make signs directing your guests to your house.  What can I say, I live in southwestern WI where the cows outnumber the people.  :)

Sunday, May 22, 2011

To Everything There is A Season....

I have had this verse down on my Stampin' desk for months.  I never could remember to buy a frame for it.  Well my absolutely wonderful mother-in-law (and friend I may add), brought me one home.  She even got it on sale!! ♥  Less money for frame = more money for SU! 

I used glass cleaner on the glass of the frame to make sure there was no dirt or oil that would prevent the Decor Element from sticking.  Then I added the verse right to the front of the glass.  Behind the glass inside the frame, there is a piece of the Paisley Print dsp.  Last month we got a little sneak peek of this GORGEOUS dsp.  While you can't order it right now, it will be back in July!  I can't wait.  I'm so buying more of it! 
The nice thing about adding the Decor Element to the glass is I can switch out my dsp whenever I want. 
I'm very happy w/ my finished product.  :) 


Saturday, May 21, 2011

AHS Graduation Cards

We are counting down.  There is one week until graduation; however, the graduation parties start tomorrow.  I had never heard of anyone having a pre-graduation party, but there are several of Dani's classmates that have taken that route.  Perhaps it's a good idea, because I think there are parties EVERY weekend through the entire month of June.  EEEEEK! 

I wanted to make special invited for Dani's closest friends. Jackie Topa shared these cap and gown invites and I thought they were just perfect for the graduates. I did change the style of the card from a tradition A2 card to a pocket card. The cardstock for the base measured 6" x 9 1/2". On the 6" side, I scored a 1/2" to make a flap for adhering the pocket together. On the 9 1/2" side, I scored at 4 1/4" from one end and 1" from the other. This will make an A2 pocket card. I didn't take pictures tonight. I f you are a visual person like me and want pictures, leave a comment and I will post them tomorrow. :)

I love the sentiment.  It is from page 26 of the new Summer Mini.  It is called Happy Greetings.


I used the Go, Graduate set that retired to make the inside of Jodi's card.  Jodi has been Dani's closest friend  for as long as I can remember.  She is the nicest girl and I will miss her terribly.  She is a good Christian girl w/ a wonderful sense of humor.  I am not putting the "Go get a job" sentiment in all the cards, but I know Jodi will get a good giggle out of it!  She has been a wonderful friend to Dani.  (sniff) I know there will be a lot of tears from this ol' mom when these girls head off to separate colleges this fall.  :(  Oh yeah, back to the card--IF you did not purchase the Go, Graduate stamp set, it is not too late.  How you ask...  My Digital Studio!  Yep, the download is available.  The great thing about MDS, you can make the images BIGGER!  I love being able to change the sizes of SU! stamps with a click of the mouse. 


Here's the 4 cards for Dani's best buds.  None are the same--I just went for it.  :)

Tuesday, May 17, 2011

Thank you 'Tween-Kitty Cards

Riley Kate had her 13th birthday party a couple weeks ago. It was WILD!  There were 10 'tween girls in my house.  I think they had a great time and I know that Riley Kate loved being the birthday girl/center of attention.  :)  She is such a social butterfly! Personally, I'm glad she only has a birthday once a year.  I was exhausted after 24 hours of 'tween....  LOL

Now it's time for thank you cards.  I am one of those mean mom's that still thinks that if you receive a gift-you send a thank you.  Today I spent 30 minutes making thank you cards. Honestly they only took 30 minutes. I had  exactly 30 minutes before I had to have Evan up from his nap.  I came up w/ this little simple thank you using Touch of Kindness stamp set from the Summer Mini Catalog. 


In 30 minutes, I finished a dozen of these little 3"x 3" cards.  They are very simple and if I were giving them to adults I would do a little more embellishing and layering, but I thought they were just right for the girls.  :) 


Monday, May 16, 2011

Kindness--It's For the Birds....

Graduation is drawing nearer and I think I might actually survive this.  In a couple of weeks, it will all be over and I will have 5 years to recover before Riley Kate's party.  A bit of advice to all you Mom's--don't procrastinate!  First of all, know where your kid's school pictures are (write on the back or jot down what grade, because regardless of how you think you will remember--you won't!).  I have spent so much time searching through boxes of pictures.  I really am going to take advantage of MDS and SU! printing for Riley Kate's graduation.  I am starting a photo box w/ my favorite snapsnots of Riley Kate and her school pictures from each year.  This digging through pictures is for the birds. 

Speaking of for the birds, here's the sketch for this week's sketch challenge over at Krista's Cards & Things Challenge Blog.  

I didn't mean that the sketch was for the birds.  Oh no, it is a wonderful sketch, but my card is for the birds!  :)  I absolutely fell in love w/ this set the moment I saw it in the new Summer Mini Catalog.  It's called Touch of Kindness.  I love whimsical sets like this. 


Here's a close up of the front.  I was having so much fun watercoloring the cat.  I think he turned out pretty cute.  He must have been okay, because Riley Kate has already claimed the card for one of her friend's birthday card.   I don't mind--it's a great excuse to make more!

Thursday, May 12, 2011

Folded Ribbon Tutorial

How DID you do that?

Last week, I had a workshop w/ a bunch of really nice ladies.  They liked this card, but a lot of them were confused on how to make the folded ribbon on the front of the card. 


Today, I thought I would share w/ you how to do it. It's quick, easy and relatively painless. Just kidding--it is completely painless.  LOL  

The Basic Black satin ribbon  I used for this card measures about 7 1/2" long. The card is 4 1/2" square.
Doesn't the ribbon along w/ a vintage brad really fancy up the card?


On my card, I layered Basic Black on Basic Black.  I started w/ a Basic Black piece just an 1/8" bigger than my dsp.  I wanted something to punch my brad through and attach my ribbon without being seen on the inside of my cards.  I like my insides clean.  :)


Using plain old scotch tape, I taped the ribbon to the back of the cardstock.  I like scotch tape for this in case you need to adjust the ribbon.


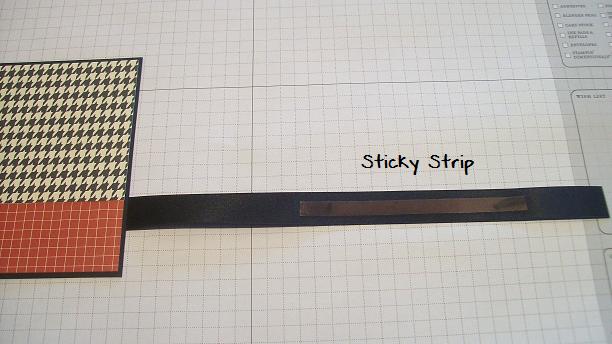
Add sticky strip to your ribbon, I used about 4" on my card. It's hard to see in my picture, but there's sticky strip on there.


I do a double check to make sure that I have sticky strip right where I want my folds.  If not, I adjust my ribbon.

Now just fold your ribbon back and forth making your folds.  The sticky strip will hold it in place.  I typically do 3 folds. 


There they are.  :) If you don't like how they look you can pull the folds back apart and try again.  Sticky strip is so sticky can adjust the ribbon quite a few times before it loses it's stick.


Using my crop-a-dile (I love this tool!), punch a hole for your brad.  Trim the end of your ribbon.


Add to your card base.  See no dirty insides!  LOL


 I watercolored my roses from the Elements of Style set using Aqua Painters and reinkers. My palette is the top of my ink pad.  It works wonderful so that when you want to watercolor again, you know where your palette is and what color it is.  :)


Do my aqua painters look different than yours?   Inside my aqua painters I added a piece of sponge to work as a bladder.  It keeps the water from coming out too fast and washing out my color.  It is great for a new watercolorer or someone like me that is watercolor challenged.  :) 


If you put in a $50 order (before s/h & tax) through my ONLINE STORE or contacting me by phone or email, I will put your name in a drawing to win a free stamp set. For every $50 you spend your name will be entered again. If you name is drawn, you can choose from the stamp sets I have remaining each week.

Tuesday, May 10, 2011

Organizer Tutorial

Here's a quick step-by-step tutorial showing you how to make the desktop organizer that I posted last week. They are quick easy gifts that always seem to be appreciated.  I have filled them w/ cards and envelopes or scrap paper.

First score your cardstock 2" inches from the top of the 8 1/2" side of your cardstock and then again at 3".  (This will be the top of your organizer.) 

Turn your paper and score 1" and 2" from the edges of your l1" sides.


On the bottom of your cardstock score 1" and 2" from the 8 1/2" edge.


Now you are going to cut away to the 2 outside squares on both sides of the 2" and 3" score lines and cut in to make flips for folding your organizer.


On the bottom of your project cut away the 3 outside squares as shown and cut in to make your flaps.


This is how your organizer will look and  now is ready to assemble.


Using snail or sticky strip add adhesive to your flaps.


Now stick all 4 flaps inside the organizer.


Add adhesive to your sides and fold down them down.


Add adhesive to the two rectangles at the top of the box.


Fold down and your box is ready to be decorated.


I hope you have fun making these!  :)


I have EXTRAS so I'm making my blog readers an offer....


.....If you put in a $50 order (before s/h & tax) through my ONLINE STORE or contacting me by phone or email, I will put your name in a drawing to win a free stamp set. For every $50 you spend your name will be entered again. If you name is drawn, you can choose from the stamp sets I have remaining each week.


Saturday, May 7, 2011

Skittles

 I am always looking for treat candies to use in test tubes. I love giving them to customers who book parties at workshops.   I love holiday M&Ms, but used up all I had left from Easter so I went on a hunt for the perfect candy.  I wanted something that #1 matched our SU! colors, #2 fit in the tests and #3 were bright for spring and summer.   I found them--tropical skittles.  There is a not so good looking mauve/pink color too (it's really ugly) in the bag, but here are the rest of the colors....

The green is a little brighter than any current color SU! carries, but for us old timers it's definitely Green Galore! :)  The yellow matches Daffodil Delight. The orange matches Pumpkin Pie or even Peach Parfait. The blue match Pacific Point. I love how bright they are.  

I did use the retired stamp from the Sale-a-bration set, Punch Bunch.  It's a favorite. If you put in a $50 order w/ me from  my online store you could win a chance to own Punch Bunch if you don't have it already. 


Friday, May 6, 2011

Strength & Hope


Item #118100 $17.95 (wood) or #123660 $13.95 (clear)


 I love this  beautiful set and SU! is donating $2 from every set purchased to The Breast Cancer Research Foundation.  In the last few months, cancer has shoved itself  onto center stage in my family.  I have a cousin battling breast cancer.  A brother in law who was diagnosed w/ cancer back in early February (Esophegael) and just a couple weeks ago my stepdad found out he too has cancer (Prostate).  


 My card has a little 'hope tag' on the front.  


The background has a few butterflies stamped in Blushing Bride and then I covered the background w/ the word stamp in Crumb Cake stamping off for some so it gave the card some depth.  Then we sent the background through the Big Shot in the Square Lattice Impressions Folder.

A few little extra touches-- some paper piercing, a staple, some little jute twine and a butterfly.  Voila--my Strength and Hope card. 

**If you order this set from my online store, I will send you one of these cards to keep for yourself or share with someone who needs Hope and Strength.  Spend $50 and your name will be put in the drawing for a free set.

Related Posts Plugin for WordPress, Blogger...