Monday, February 15, 2010

1/2 Ragged.....


Well being as it is my second day sewing, I thought I had reached a 'professional level'. Ohhhh quickly I learned that I was wrong. All was going well.

The blocks were run through my Big Shot and they were quilted.
I learned a lesson from my first bag and made my cotton batting smaller 3"x3" so that it didn't accidently get stitched into the seams.

I learned a little bit about assembly to chain my pieces together so that it putting the bag together goes faster. This bags are incredibly easy (if you pay attention to what you are doing..lol unlike me) and you can probably make a bag start to finish in about 2 hours.

However....lol...I stitched my 2 chains of blocks together backwards... so my bag is only half ragged. Notice all my vertical seams are scallopless. I freaked out a little and grabbed the seam ripper. I can honestly say that I have issues w/ the seam ripper and we are not on friendly terms. I am impatient and clumsy and seam rippers often make tears in me or the fabric. With that being said, I decided to leave it and work w/ it.

I REALLY LIKE the finished bag even though it's only 1/2 what I intended! :)

Did you notice the fabric? I made a bag out of it yesterday too. I bought a yard of 3 fabrics. I am guessing I can make at least another bag maybe two out of 3 yards. I think that's pretty good!

Sunday, February 14, 2010

Rag Bag Bandwagon

I jumped on the bandwagon. It was a huge LEAP for someone like me--I don't sew. I have seen the bags and loved them. This is my first attempt and I'm happy--The bag actually resembles those I have seen online. I had to go it alone without any tutorials. My computer is too slow and will not load videos. So be kind....this is me alone w/ my very dusty sewing machine that my Mother-in-law gave me when Terry and I got married.


My oldest daughter, Dani likes the 'RAG' bag look:


My youngest daughter, Riley Kate likes the 'Clean' bag look:


What do you like best?

Terry's Valentine

Happy Valentine's Day! Ahhh....love and all that jazz. I hope you and your special someone have a great day today. Today, I will be hanging out at home waiting for the Dish Installer to come. We are FINALLY going to upgrade from dial up. YEA! I'm a little worried; however, this is not the first visit from our friendly installer. He has been here over 12 hours in the last 4 days.He can't get it to work! :( BUT, I have faith that today is the day. I can't wait to actually 'surf' the web--for the last 10 years online it's been more of a 'doggie paddle'.


Being that is it Valentine's Day and all, I made a card for my dear sweet husband, Terry. He puts up w/ me and my stamp addiction. Who could ask for anyone better? :)

Masculine Valentine Cards (groan)--definitely not my bag, but I struggled through it, but I came up w/ a card that Terry will appreciate. This is definitely a NO FRILLS card..


Card Recipe:

Stamps: Circle Circus, You and Moi (SAB)
Cardstock: Whisper White, Basic Gray, Basic Black, Real Red
Ink: Basic Gray, Real Red
Ribbon: non SU!

Monday, February 8, 2010

Flower Pot Box Directions


Many of you have asked for directions for my Flower Pot Box and I'm sorry that I didn't get around to posting it sooner, but here it is....


-Start w/ a piece of cardstock 6"x 11"
-Score on the 11" side at 1 1/2" and 4 1/2"
IMPORTANT: DO NOT score above the 4 1/2" line you just made. The top 1 1/2" will make your flaps and you don't want score lines in them. :)
-Score on the 6" side at 1 1/2", 5", 6 1/2" and 10"
-Above that 4 1/2" line I cut diagonal lines starting 1/2" wider than the 3 1/2" sides of the box and cut down to the score line.
-Cut off the top portion of the 1 1/2" sides of the box.
-Cut off the bottom part of the 1" portion--this 1" section will be used only for assembly and will not be seen.
-Fold, glue and decorate... WAH-LAH!! :)

Friday, February 5, 2010

Why You Should Bring a Friend....

...to my Stampin' Up!© Workshop! :)

First of all, it's the most fun you will EVER have!
Second, there is always chocolate--no one should stamp without it!
Best of all, there's always Stampin' Friends!

And if you bring along one of your Stampin' Friends to my workshop not only will you receive a bag of goodies so will she!


See? I told you there's CHOCOLATE!!! :)


Each bag has 2 3"x3" cards with matching envelopes, 3 Hershey's Nuggets and 1 coupon for 10% off your order that day. To top it off, I added a piece of Stampin' Up!'s beautiful grosgrain ribbon to tie the cello bag. I love ribbon almost as much as chocolate, don't you?!

Now how can you go wrong attending a Stampin' Up!© Workshop and bringing your BFF along?!


Project Recipe:
Stamp Set: Vintage Vogue
Cardstock: Regal Rose, Bashful Blue, Certainly Celery and Whisper White
Ink: Bashful Blue, Certainly Celery (Coupons are printed off the computer)
Accessories: Ribbon, Cello Bags, dimensionals, silver brads

Wednesday, February 3, 2010

Blue Flowers

Thanks to all the cards I've seen made--I love the new Vintage Vogue set. I didn't purchase it right away, because I wasn't sure what I'd do with it. Well...now I have 100s of ideas and can't wait to get started!

I made these for my workshop on Saturday. There are two things I know for sure about my Hostess. She loved flowers and the color blue. I think she will go absolutely crazy when she sees these cards. :)


Thank you, Elizabeth Harris for the inspiration! You rock...


The card uses NO DSP--perfect for creating a lot of cards.

A Little Treat Bag w/ a handful of kisses inside:


Treat bag dimensions:
3 3/8 x 10 1/2
score at 4, 4 1/2, 5 and 9


Card & Bag Recipe:
Stamps: Whimsical Words, Vintage Vogue
Cardstock: Night of Navy, Bashful Blue and Whisper White
Ink, Night of Navy, Bashful Blue and Certainly Celery
Accesories: cello bag, rhinestone brad, silver brad, bashful blue striped ribbon, navy grosgrain, dimensionals, scallop trim border, lots of tags die and sponges

Love is in the Air....

Today, I was looking through my CASE folder. Yes, I have one of those chuck full of creations that are just too cute not to make. It will take me years to make all that are in the folder, but today I put a teeny tiny dent in it---I made two! LOL

These cards were inspired by Vicki and Ilina.
They are both changed up from the originals--sometimes I am a creative CASEr. *snicker*

Card Recipes:
Stamps: Teeny Tiny Wishes
Cardstock: Kraft, Real Red, Chocolate Chip
DSP: Sending Love Specialty
Ink: Chocolate Chip
Accessories: hole punch, 1 1/4" square punch, real red grosgrain, heart to heart punch, mat pack, paper piercer, 2 way glue, pinking hearts border

Tuesday, February 2, 2010

For My Hostess


To show my appreciation to my hostess, I made her a gift set of cards to give along w/ all of her other hostess benefits. I had a lot of fun making these cards using the scallop square die. The scallops just give them a little something special, don't they? The scallop cards are a little narrower than a traditional A2 card, but still close enough in size to use the A2 envelopes.
I used little Old Olive Striped Ribbon and a tiny piece of linen thread to attach my 'Thanks" tag and wah-lah...a pretty little gift. Now how cool is that? And during SALE-A-BRATION that little thanks stamp is FREE! It is from the Thank You Kindly Set which is one of the FREEBIE sets for orders over $50. :)
Card Recipe:
Stamps: Inspired by Nature, Thank You Kindly
Cardstock: Whisper White, Chocolate Chip, So Saffron
Stampin' Write Markers: So Saffron, Chocolate Chip, Old Olive
Accessories: Old Olive Striped Ribbon, Scallop Square Die, Big Shot, Large Oval & Scallop Oval Punch

Bring A Friend


I wanted a special little gift card to give to customers that bring a friend along to my workshops. I made a bunch of these little cards over the weekend for my customers and their friends. Along w/ the cards, I have a couple other surprises for Stampin' Friends that attend my parties. :)

Card Recipe:

Stamps: Vintage Vogue

Cardstock: Whisper White and Bashful Blue

Ink: Regal Rose

Stampin' Write Marker: Certainly Celery

Accessories: Paper Piercing Tool, Mat Pack and Dimensionals

Monday, February 1, 2010

Thinking Spring

Is it spring yet? I'm ready for green grass and bright butterflies, but living in Wisconsin it may be a couple months before I see either of those things. That's the great thing about stamping... I can make my own. :)
Now if I could just make it 70 degrees outside. LOL

Card Recipe:
Stamps: Well Scripted, Inspired by Nature
Ink: Old Olive
Cardstock: Rich Razzleberry, Old Olive and Whisper White
DSP: Cottage Wall, Rich Razzleberry
Accessories: Wide Oval Punch, Scallop Trim Punch, Lot of Tags Die, SU! Perfect Polka Dots Textured Impressions Folder, Butterfly Punch, Linen Thread

Saturday, January 30, 2010

Flower Pot Box

Good Saturday Morning, the sun is up in Wisconsin and as promised I took some pictures of my latest project to show you. I need hostess gifts for a couple upcoming workshops and I couldn't think of quicker or cuter gift than a little box full of these 3" x 6" cards made with the CUTE Sweet Pea DSP Stack in the Occasions Mini . There isn't a single sheet in the whole stack that I can't think of a use for as a cardmaker. :)
Here are my cards:
I made 8 cards (2 cards of 4 designs)


These 2 are my absolute favorites:

They use the backside of the flower dsp as a border across the bottom of the card--yep the backside is as cute as the front!

It took me a little time to figure out the little Flower Box for the cards, but I'm pretty happy with the results. :) This little box is bigger than the Birds' Nest I made a couple days ago--I wanted to fit the SU! envelopes and an RSVP pen in to give as a gift set. This little box is 3 1/2" wide x 1 1/2" deep. I love the matching Sweet Pea felt flowers on the front of the box. They are so stinkin' cute! The colors are so bright--I can't help but smile.

Wouldn't it look cute on your desk?

Gift Set Recipe:

Cardstock: Red Rose, Old Olive, Pumpkin Pie

DSP: Sweet Pea (Occasions Mini)

Stamps: Teeny Tiny Wishes

Accessories: Sticky Strip, Bone Folder, Sweet Pea felt, glue dots, Always Artichoke grosgrain, word window punch, modern label punch and eyelet border punch

Wednesday, January 27, 2010

Sweet Treat Top Note Holder Step-by-Step

I had a number of requests for directions for the Sweet Treat Top Note Holder that I posted earlier today. They are really easy to make....

Here we go...
(be kind this is the first Step-by-Step I have ever done)


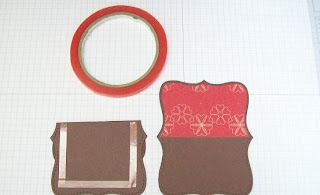
Step 1: Cut out 2 cardstock Top Notes and 1 DSP Top Note.
Note: Notice that the Top Note is not the same on top and bottom. The points are different--make sure you have matching points on the top and bottom so when it comes time to assemble it will match up. (The voice of experience...LOL)
Step 2: Trim your DSP Top Note on the perforated line.
Step 3: Cut in half.
Step 4: Adhere 1 piece of the DSP Top Note to the top of the BACK Chocolate Chip Top Note.
Step 5: Adhere the remaining DSP Top NOte to the bottom of the FRONT Chocolate Chip Top Note.
Step 6: Fold over the FRONT Top Note. I use my bone folder to get a nice crisp edge.
Step 7: Tape your flap down--this is optional but I find it easier to work with.


Step 8: Using Sticky Strip make a pouch.


Step 9: Assemble. I squeeze the sides a bit and stick my hand down in the pouch to form a pocket so the candy will fit better in there. It's pretty tight and needs to be 'worked over' a bit. :)

Step 10: Decorate. :)


Recipe:

Stamps: Love Bandit (Occasions Mini)

Cardstock: Chocolate Chip, Real Red, Whisper White

Ink: Close to Cocoa, Chocolate Chip

DSP: Sending Love Specialty

Accessories: Sticky Strip, 1 1/4" and 1 3/8" circle punches, modern label punch, word window punch, heart to heart punch, dimensionals, white grosgrain ribbon, aquawriter.

Related Posts Plugin for WordPress, Blogger...