Saturday, January 30, 2010

Flower Pot Box

Good Saturday Morning, the sun is up in Wisconsin and as promised I took some pictures of my latest project to show you. I need hostess gifts for a couple upcoming workshops and I couldn't think of quicker or cuter gift than a little box full of these 3" x 6" cards made with the CUTE Sweet Pea DSP Stack in the Occasions Mini . There isn't a single sheet in the whole stack that I can't think of a use for as a cardmaker. :)
Here are my cards:
I made 8 cards (2 cards of 4 designs)


These 2 are my absolute favorites:

They use the backside of the flower dsp as a border across the bottom of the card--yep the backside is as cute as the front!

It took me a little time to figure out the little Flower Box for the cards, but I'm pretty happy with the results. :) This little box is bigger than the Birds' Nest I made a couple days ago--I wanted to fit the SU! envelopes and an RSVP pen in to give as a gift set. This little box is 3 1/2" wide x 1 1/2" deep. I love the matching Sweet Pea felt flowers on the front of the box. They are so stinkin' cute! The colors are so bright--I can't help but smile.

Wouldn't it look cute on your desk?

Gift Set Recipe:

Cardstock: Red Rose, Old Olive, Pumpkin Pie

DSP: Sweet Pea (Occasions Mini)

Stamps: Teeny Tiny Wishes

Accessories: Sticky Strip, Bone Folder, Sweet Pea felt, glue dots, Always Artichoke grosgrain, word window punch, modern label punch and eyelet border punch

Wednesday, January 27, 2010

Sweet Treat Top Note Holder Step-by-Step

I had a number of requests for directions for the Sweet Treat Top Note Holder that I posted earlier today. They are really easy to make....

Here we go...
(be kind this is the first Step-by-Step I have ever done)


Step 1: Cut out 2 cardstock Top Notes and 1 DSP Top Note.
Note: Notice that the Top Note is not the same on top and bottom. The points are different--make sure you have matching points on the top and bottom so when it comes time to assemble it will match up. (The voice of experience...LOL)
Step 2: Trim your DSP Top Note on the perforated line.
Step 3: Cut in half.
Step 4: Adhere 1 piece of the DSP Top Note to the top of the BACK Chocolate Chip Top Note.
Step 5: Adhere the remaining DSP Top NOte to the bottom of the FRONT Chocolate Chip Top Note.
Step 6: Fold over the FRONT Top Note. I use my bone folder to get a nice crisp edge.
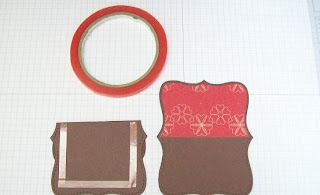
Step 7: Tape your flap down--this is optional but I find it easier to work with.


Step 8: Using Sticky Strip make a pouch.


Step 9: Assemble. I squeeze the sides a bit and stick my hand down in the pouch to form a pocket so the candy will fit better in there. It's pretty tight and needs to be 'worked over' a bit. :)

Step 10: Decorate. :)


Recipe:

Stamps: Love Bandit (Occasions Mini)

Cardstock: Chocolate Chip, Real Red, Whisper White

Ink: Close to Cocoa, Chocolate Chip

DSP: Sending Love Specialty

Accessories: Sticky Strip, 1 1/4" and 1 3/8" circle punches, modern label punch, word window punch, heart to heart punch, dimensionals, white grosgrain ribbon, aquawriter.

Textured Cardstock Share Is CLOSED!

The Textured Cardstock Share was a success.
We have found homes for over 1700 pieces of cardstock. :)

Thank you, Lee! I really appreciate you hosting this!! ***HUGS***

A Sweet Top Note Treat Holder

Do you have someone that makes your day special? Well here's a quick easy little gift you can give this Valentine's Day to let them know how much they mean to you. :)

My little gift was SUPPOSED to have a mini bag of M&Ms inside, but they have come up missing....hmmmm... I would pretend to be surprised, but when my husband smiles at me, I can see his sweet tooth. LOL


Recipe:
Cardstock: Whisper White, Choclate Chip, Real Red (punched hearts)
Stampin' Write Markers: Chocolate Chip, Real Red
Stamps: Matchbox Messages
DSP: Sending Love Specialty Paper
Accessories: Heart to Heart Punch, 1 1/4 & 1 3/8 circle punch, white grosgrain ribbon, dimensionals, 2 way glue, Dazzling Diamond glitter, sticky strip (to make the pocket inside) and MOST IMPORTANT----CHOCOLATE~~

***When I make these little holders, I run two pieces of Chocolate Chip CS and 1 piece of DSP through my Big Shot using the Top Note Die all at once.
Then I cut my DSP Top Note in half and trim on the perforated line.

Sweet Pea Birds' Nest


You just can't have all those Sweet Pea Birds loose in your Stampin' Room--Oh no!
They needed a 'nest'...a Sweet Pea Birds' Nest. LOL
I made a quick little box for the cards using a piece of the leftover DSP & cardstock.
The dimensions for the box are 3 1/4" wide x 1 1/2" deep--just in case you ever have
Sweet Pea Birds in your Stampin' Room. :)
Nest Dimensions:
4 1/2" x 10 1/2"
On the 4 1/2" side score at 3" (the 3" portion is the sides of your box, the 1 1/2" portion is the flaps.
On the 10 1/2" side score at 1", 2 1/2", 5 3/4" and 7 1/4"
**** IF you want to put envelopes in your nest you will need to make it just a smidge wider. :)

Sweet Pea Birds

At first glance, I loved the new Sweet Pea DSP Stack. There are so many cute sheets in it that just beg to be made into cards. However, there were these two sheets of silly birds in the stack that had LONG legs that stretched the entire length of the 12 x 12 sheets. How do you make a card out of that? You shorten their legs a bit and make adorable 3 x 6 cards out of them!!

These little cards are so much fun!


In total, I made 8 Sweet Pea Bird cards. (There are only 7 cards pictured above, but I did make 8--one was camera shy I guess). I cut the two sheets in half hortizontally and used the top portion (which had the birds) to make my cards. I cut little pieces using bottom of the leftover DSP to make the little houndstooth border--you can see it on some of the cards above. What is exciting to me is that out of the 2 sheets of DSP, I have a piece that is 6 x 6 and another piece that is 12 x 6 leftover to make other cards with. So if you are like me and a little stingy with your DSP--3 x 6 cards are great. A little DSP--A LOT of cards!

AND...Stampin' Up!© sells the little envelopes these cards fit inside. :)
#107286 Small Open-End Envelopes--Whisper White

Tuesday, January 26, 2010

Cardstock Share UPDATE- We need your help to close out this share!

Here's a little update as to how much is still available and where everybody's at for this share.
As of now, this is the amount of each color that we have remaining- See this post for the all the freebies you get by helping Lee and I with this share :)

Chocolate Chip, Close to Cocoa, Summer Sun, Pumpkin Pie, Ruby Red, Garden Green, More Mustard and Not Quite Navy have all sold out.

Creamy Caramel has 1 left
Really Rust has 1 left
Cameo Coral has 3 left


Don't forget if you order $50 or more to add in your SAB sets!! :)

Monday, January 25, 2010

Cloudy Day Masculine Card

This card is for Mary Jo's SCFC1 Challenge. I found a great card by Wendy Weixler using this great sketch that I have seen around a lot lately. I took a VERY FEMININE card that Wendy made and turned it into a VERY MASCULINE card of my own.

The funny thing is that Wendy's card attracted me, because it used the Inspired by Nature stamp set and pink. However, I decided that it was time for me to move away from the flower (did you notice I just used the grass in this card???) and pink for at least one card. You are bound to see them again--just warning you so you are prepared! :)
This card is so outside my comfort zone. #1 it is masculine -- I tend to shy away from them.
#2 I used an aquawriter and did a little watercoloring for the grass. I tend to saturate my paper and make a mess. I admit my cardstock was WET, but I have grass! AND...did you notice my clouds? I have seen Gretchen make BEAUTIFUL cards using her handmade cloud template. My clouds and template need some work, but I was pleased w/ my first attempt at making clouds. :) Whew! I'm tired... this card caused me stress... LOL
I really liked how it turned out though and I hope you do too!
Here it is:
Card Recipe:
Stamps: Nature Silhouettes, Inspired by Nature
Cardstock: Bordering Blue, Old Olive, Chocolate Chip and Whisper White
Ink: Bordering Blue, Old Olive and Chocolate Chip
DSP: Old Olive
Accessories: Chocolate Chip grosgrain ribbon, aquawriter, my cloud template (scallop oval punch in this case), dimensionals and a sponge

Thursday, January 21, 2010

Baby Girl Overalls

I love all things pink and girly. I'm sure you've noticed if you follow my blog at all. I loved the challenge this week from LateNightStampers. The challenge was to use this super girly birthday cake as inspiration to make a card. I was just giddy--all those stripes, polka dots and pink. YEA! LOL

But seriously--what little girl gets a cake like this? And how on earth could you cut it??


Here's my baby girl overalls. I just love them--couldn't you see a little girl running around in them?


Recipe:

Cardstock: Regal Rose, Certainly Celery, Barely Banana

DSP: Certainly Celery

Accessories: Cupcake (die cut), signo white gel pen, small tag punch, 1 1/4" square punch, 1 1/4" circle punch, rhinestone brad, dimensionals


This is my template: I would love to be able to share it w/ all of you, but I don't have photoshop or anything like that....I do everything with paint. :( If you have any suggestions please email me or leave a comment.


Wednesday, January 20, 2010

It Calls to Me...

Use me! UsE mE! USE ME!!!
'IT' is the Inspired by Nature stamp set in the IB&C.... I can't seem to stay away from this set. It has been dusty up on my shelves for a LONG time. Now that I have it down and dusted off, I can't leave it down. I love it! This set is one that will never be sold or traded. It has earned it's place on my shelves.... :)
The cards are QUICK and EASY--I made them while Evan was napping today.


Stitched Felt Flowers

My naked little felt flowers from a few days ago got a makeover tonight. NOW I remember why I saved all that DMC floss from the 1990s---to stitch felt flowers. :) It took me awhile to decide what I was doing and I ripped out as many stitches as I put in, but I'm pretty satisfied w/ my first attempts. They aren't fancy nor are they elegant--they are just kinda cute....
I think I will try tulle, glitter and maybe more bling on future flowers when I get a little more brave.


This is my pink and green combo....


Now I stacked them up and added some floss to the button...


I can't wait to use these!!!I absolutely fell in love w/ the red and gray (although it looks like chocolate and red which would be another good combination).


Isn't it neat?

Tuesday, January 19, 2010

Earth Elements TEXTURED 12 X 12" Cardstock Share

Here's an update on what is still available.
For more information scroll down to the original post or click here to see it.

1. Chocolate Chip SOLD OUT
2. Close to Cocoa SOLD OUT
3. Creamy Caramel (4 packages left
4. More Mustard (3 packages left)
5. Pumkin Pie SOLD OUT
6. Really Rust (4 packages left)
7. Ruby Red SOLD OUT
8. Cameo Coral (3 packages left)
9. Summer Sun SOLD OUT
10. Garden Green (1 packages left)
11. Not Quite Navy SOLD OUT

Lee's email address:inkartfromtheheart@sbcglobal.net
Lee's phone number: 330-745-5716
Related Posts Plugin for WordPress, Blogger...