Thursday, March 31, 2011

Creative Parenting 101

Some days, mommies just have to be creative--especially if they want to get something done around the house. Today my goal was to clean up the laundry room. Evan definitely had other ideas.  While I'm in the laundry room, he was unpacking the folded clothes, on the counter in the kitchen helping himself to whatever he could find, reprogramming the televison.  You know--those things that toddlers do to help keep mommies busy. 

 I had just finished cleaning the laundry tub when I had a thought.  Evan needs a bath and I know he'll fit in here.  I gave him a couple clean containers and enough water to wash himself and half of the laundry room floor.  :)  He's clean.  The laundry room is clean. 

Just another day in the life of Creative Parenting 101.

Wednesday, March 30, 2011

Criss Cross Cards 101

Several people have requested dimensions for the criss cross card that I am making for Dani's graduation invite. They are really very simple.


First, cut your 8 1/2" x 11" cardstock in half so that you have 2- 4 1/4" x 11" pieces.


Score both of the pieces at 5 1/2" on the 11" side

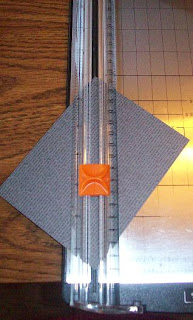
Cut off the corner of each both pieces from the bottom corner to the top of the score line.


 Here are the cut pieces.
Tape the 2 square portions of the cs together so that you have a flap on each side.


Cut a piece of DSP 5 1/4" x 4
Then cut diagonally.  If you are going to use DSP on both flaps make sure that you use a pattern that can be flapped and not be upside down or you can use the backside for the other flap.  **I learned the hard way.**  LOL


Then cut a piece of cardstock for the bellyband 3/4" x 12"
I score the band a few inches from the one end so I can have a straight edge to wrap around to start the band. :)


Dress it up and VOILA! a criss cross card.
Your insert for your card should be about 5 1/4" x 4".  (I haven't printed all the graduation information out yet, but as of this morning I have 50 invites made.  That's a lot of criss-crossing!)

Monday, March 28, 2011

Real Men...

...can handle a little pink! 

This week's challenge over at Cards & Things just screamed Extreme Skateboard to me.  I don't know why these crazy notions pop into my head, but I had to make a masculine card using these colors. 

 Here's my card!  This is also the sketch from Mojo Monday. I have never participated in their challenges but I thought this would be a fun one to try. :)


I think it turned out pretty good and most guys wouldn't be too upset about the Pink Pirouette in the background.  Can you find it?  It's subtle, but it is stamped back there twice.  :)


Here's a close-up.  There's pink in that thar left hand top corner!!!!  LOL
I think I know just the 'cool guy' for this card. 

Sunday, March 27, 2011

Graduation Invites--Mass Production in Thrifty Style

After viewing the Josten's catalog that was sent home with our high school senior, I decided that I was definitely going to make Dani's graduation invites and thank you cards. I have never seen such crazy inflated prices.  For a family on a tight budget right now, these prices made me feel a little faint.  I'm so glad that Dani was all about being thrifty like her mom when it came to the invites!  We did REALLY good today--I think I made the invites for maybe .50 each. Granted there's no fancy embellishments, but they will be much easier to mail out this way. 

 So today I sat down and my goal was to finish 2 dozen invites.  I wanted to do most of it while Evan was napping, because he is in full destruction mode when he's awake.  I must have forgotten that 2 year olds have no mercy.  I also learned that big sisters have absolutely no interest in chasing him while mom makes cards. 


Dani really liked criss-cross cards  and we decided that we liked just one flap covered w/ DSP.  That was great, because each piece of 12" x 12" DSP would cover a dozen flaps. 


We chose a textured cardstock for the belly band.  We contemplated using ribbon, but again much less costly.  Today, I used not quite 2 sheets of 12" x 12" Pumpkin Pie Cardstock. 


Using the corners I cut away to make the criss-cross card bases, I punched the Basic Black scalloped circles.  I also used scraps of Whisper White cardstock that were big enough to punch out 1 3/8" circles.


My friend, Wendy was so nice.  She used her die cut machine and cut out these cute little bitty number 1's for us.  I just didn't have anything the right size.  Thanks, Wendy! ♥
They were buggers to get on though--they were tiny!


Yep, thrifty moment.  I cut my dimensionals into halves or fourths.  They go 2 to 4 times further and work just as well.

All popped up! We are in the home stretch....

Here are the 2 dozen invites (minus the party information).  No one seems to know what time the ceremony is so I have no idea what to put for a start time for her party.  LOL  You know those last minute details.  :)  Dani said she will find out tomorrow so I can type up and print out the insert.


I think they turned out pretty cute.  Now I have to pick another day to make another couple dozen.  Oh boy! 

Friday, March 25, 2011

Ribbon of Hope

 A little over a month ago, my brother in law, Jeff went into the emergency room with stomach pain.  After several tests, the results came back that Jeff has cancer.  He had spots on his liver, in his lymphnodes in his groin and a tumor on his esophogus.  It is inoperable and incurable.  He had his second chemo treatment yesterday..... 

  This afternoon is the benefit for him.   I wanted to make Jeff and my sister, Julie some simple thank you cards for some of those who gave them gifts and donated items for the benefit. 
Using the Ribbon of Hope stamp and the retired color Almost Amethyst (close to periwinkle right?), I made them almost 3 dozen thank you cards.   They aren't fancy, but they are functional. 


I found this great poem online.  I thought it was absolutely perfect.

If you would like to send cards to Jeff.  He sure does appreciate receiving mail.

Jeff Qualley
1005 21st Street
Monroe WI 53516

Monday, March 21, 2011

Friends

 I can't believe how fast the last week has past by.  Last Thursday Terry had hernia surgery and I have been his nursemaid for the last few days.  He started out with a lot of pain, but seems to be doing a little better now.  It's amazing how little I get done with him home, science fair projects and Evan.  LOL

I did take some time out this morning after Evan's Speech Therapist left to play along with Krista's Card & Things Sketch Challenge this week.  I love the squares--it was a lot of fun!


This is a birthday card for my friend, Wendy. She will be celebrating her birthday on Thursday. :)


My card is a 4 1/2" square. 
Stamp: Just Believe
DSP: Elegant Soiree
Cardstock: Soft Suede, Whisper White, So Saffron
Punches:  Non-SU scallop and circle, SU 1 1/4" square
Ink: Soft Suede
Accessories: Sponge, Non-SU vintage brad, pearls

Sunday, March 20, 2011

Angie Juda's Hershey Nugget Boxes (Tutorial)


I fell in love with these little Hershey's Nugget Boxes over on Angie Juda's blog.  She did a vidoeo tutorial over on her site.  Here's the link to Angie's Video.  I can't believe these little itty bitty boxes will hold 2 Hershey's Nuggets, but they do.  :)

Here's what I used to make my Nugget Box or Nugget Purse

 1 piece 3" x 6" DSP
Scoring Tool or SU! Paper Cutter and Bone Folder
Corner Rounder
Fire Rhinestone Brad
Mat Pack
Paper Piercer
5" Real Red Taffeta Ribbon
3/4" Real Red Circle
Snail
Nuggets

First, score the long sides of your box at 2 1/2"
Turn and score at 2", 2 1/2", 4 1/2" and 5


The end with the the smallest space (1") between the last score line and the end of the DSP is the FLAP of your box.Clip off the outter part of the first two score marks.


 Round your flap.


 Tape up your box.

 Putting a little snail on each end of your taffeta ribbon, add your ribbon.  I also took an extra little piece of ribbon and wrapped around the handle to make a faux bow. 


Using your paper piercer make a hole right below where the flap ends.  You may need to bore out the hole a little so that you can get your brad through.  :)

 Make a hole through the center of your 3/4" circle.


Insert brad through the circle and front of the box.


Add your nuggets....Can you believe those chocolates fit in such a little box????


Here they are?  I think they are great little gifts.... 

Thanks, Angie!

Boy Easter Bunny

Thank you, Tami Black for giving me this idea for a Bashful Blue Easter Bunny for Evan. 
I think he's awful cute, but not sure if boy bunnies need a blue satin bow.  Hmmmm?  Maybe that's not very masculine.  LOL   

Here he is with the little girl basket...  Aren't they cute?

Monday, March 14, 2011

The Chickens and The Eggs

Everyone in our house is sick.  It is one mean virus!   Riley Kate came home last Monday with a cold and  horrible cough. Evan and I had it by Thursday.  Terry on Friday and Dani on Saturday. It is no fun when the kids and the parents are all sick.  I feel really sorry for Terry.  He has a hernia and a bad cough. He is scheduled for surgery on Thursday.  God willing, he will be well and able to have surgery. 

Today, I felt well enough to stamp after 3 days of lounging and sleeping.  What timing.... there's a brand new sketch over at Krista's Cards & Things Challenge Blog.  Why not stroll on over there and play along?


Here's my card!  It's So Saffron and Riding Hood Red. The So Saffron polka dot dsp is from the Subtles Stack and the Riding Hood Red dsp is from the retired paper Bella Rose.  I love the sentiment.  It is from the Word Play set.  When I had the card almost put together, I decided it needed something.  I added some Basic Black flourishes from the Baroque Motifs set.  What do you think?


Last summer, my daughter, Dani got chickens.  It all started when her science teacher gave her two little bantam chickens (a hen and a rooster), then all of a sudden we had 19 chickens (2 roosters and 17 hens).  It's funny how when mom isn't looking the pets multiply around here.  LOL

Here's a few of Dani's pets.  This was taken last fall when the grass was still green. Over the winter we have lost 3 chickens.  That still leaves us with 14 hens and those 2 silly little roosters!  Now she has an incubator and is going to try hatching eggs.  Oh my word...  I don't know how successful she'll be, but I'm not sure how many chickens we need!  I will say that I never thought chickens would be a fun pet, but we are really enjoying them.  They each have their very own personality AND they keep the cats off the patio. LOL 


She has a half dozen different kinds of laying hens and they are giving us quite the variety of eggs.  I love the little blue/green eggs and the itty bitty bantam eggs! We won't need to color our Easter eggs this year. They come colored straight from the hen!  Some even have speckles.   :) 


We also have a hen that is quite the over-achiever.  LOL  Her eggs are a meal all by themselves!


Most of her eggs are double yolked!

We are now getting almost a dozen eggs a day!   We are going to have a new business " Fresh Eggs".  :)
Hmmmm.....I wonder who is going to be in charge of taking care of the chickens when Dani leaves for college next year?

Wednesday, March 9, 2011

Bunny Box

I saw a little box like this made by Terri Ransom  while I was cruising around online the other day.  I just had to make one.  It is so cute! I had to improvise a little bit, because I didn't have the same supplies that were used in the original.


I also added a handle to my little bunny box.
Terri's box didn't have one, but I thought it would be 'handy'. 


Here's a close up of his cute little face. :)


Supplies:


Ears: 4-Whisper White Wide Ovals

Ears: 2-Large Pretty In Pink Ovals

Feet: 2-Whisper White Wide Ovals

Pads of Feet: 2-1” Pretty In Pink Circles

Toes: 6- 1/4“ Pretty In Pink Circles (Owl Punch or Create a Cupcake Punch or Big Bold Cupcake Die all have circles approximately this size. )

Eyes: 2-3/4” Basic Black Circles

Nose: 1 medium Pretty In Pink heart (Heart to Heart Punch)

Body: 1-Whisper White Top Note Die

Cheeks: 2- 1 3/8” Whisper White Circles

Whispers: 3- 4 ¼” long thinly cut strips of Whisper White

Box: 1-Whisper White Fancy Favor Die

Handle: 1-11” x 3/4” Whisper White

Signo gel pen

Black Stampin’ Write Marker

Crumb Cake Ink

Pretty In Pink Ink

Sponge

Dimensionals

Satin Ribbon

Glue Dot

Hole Punch

2-Pretty In Pink brads

Monday, March 7, 2011

My Dear Friend

Do you want to do something fun today?  I have just the thing for you... 
Here's the color challenge for this week at Krista's Cards & Things Challenge Blog. These colors were so easy to create with. 


I added a little chocolate chip to my card, but I think it still qualifies.  :)


Did you notice my little bow? Thank you, Mary Brown for the tutorial.  I love these little bows on all of Mary's creations.  I was excited to finally make one of my own. ♥


Card Recipe:
Stamps: All Holidays
Cardstock: Chocolate Chip, Marina Mist, Old Olive, Whisper White
DSP: Subtles Stack Certainly Celery
Ink: Chocolate Chip
Accessories: mat pack, paper piercing tool, Marina Mist 5/8" grosgrain ribbon, ice rhinestone brad (it's green), tulip embossing folder, scallop square die (yep, that's one side of the square), dimensionals, signo gel pen
Related Posts Plugin for WordPress, Blogger...