Saturday, January 30, 2010

Flower Pot Box

Good Saturday Morning, the sun is up in Wisconsin and as promised I took some pictures of my latest project to show you. I need hostess gifts for a couple upcoming workshops and I couldn't think of quicker or cuter gift than a little box full of these 3" x 6" cards made with the CUTE Sweet Pea DSP Stack in the Occasions Mini . There isn't a single sheet in the whole stack that I can't think of a use for as a cardmaker. :)
Here are my cards:
I made 8 cards (2 cards of 4 designs)


These 2 are my absolute favorites:

They use the backside of the flower dsp as a border across the bottom of the card--yep the backside is as cute as the front!

It took me a little time to figure out the little Flower Box for the cards, but I'm pretty happy with the results. :) This little box is bigger than the Birds' Nest I made a couple days ago--I wanted to fit the SU! envelopes and an RSVP pen in to give as a gift set. This little box is 3 1/2" wide x 1 1/2" deep. I love the matching Sweet Pea felt flowers on the front of the box. They are so stinkin' cute! The colors are so bright--I can't help but smile.

Wouldn't it look cute on your desk?

Gift Set Recipe:

Cardstock: Red Rose, Old Olive, Pumpkin Pie

DSP: Sweet Pea (Occasions Mini)

Stamps: Teeny Tiny Wishes

Accessories: Sticky Strip, Bone Folder, Sweet Pea felt, glue dots, Always Artichoke grosgrain, word window punch, modern label punch and eyelet border punch

Wednesday, January 27, 2010

Sweet Treat Top Note Holder Step-by-Step

I had a number of requests for directions for the Sweet Treat Top Note Holder that I posted earlier today. They are really easy to make....

Here we go...
(be kind this is the first Step-by-Step I have ever done)


Step 1: Cut out 2 cardstock Top Notes and 1 DSP Top Note.
Note: Notice that the Top Note is not the same on top and bottom. The points are different--make sure you have matching points on the top and bottom so when it comes time to assemble it will match up. (The voice of experience...LOL)
Step 2: Trim your DSP Top Note on the perforated line.
Step 3: Cut in half.
Step 4: Adhere 1 piece of the DSP Top Note to the top of the BACK Chocolate Chip Top Note.
Step 5: Adhere the remaining DSP Top NOte to the bottom of the FRONT Chocolate Chip Top Note.
Step 6: Fold over the FRONT Top Note. I use my bone folder to get a nice crisp edge.
Step 7: Tape your flap down--this is optional but I find it easier to work with.


Step 8: Using Sticky Strip make a pouch.


Step 9: Assemble. I squeeze the sides a bit and stick my hand down in the pouch to form a pocket so the candy will fit better in there. It's pretty tight and needs to be 'worked over' a bit. :)

Step 10: Decorate. :)


Recipe:

Stamps: Love Bandit (Occasions Mini)

Cardstock: Chocolate Chip, Real Red, Whisper White

Ink: Close to Cocoa, Chocolate Chip

DSP: Sending Love Specialty

Accessories: Sticky Strip, 1 1/4" and 1 3/8" circle punches, modern label punch, word window punch, heart to heart punch, dimensionals, white grosgrain ribbon, aquawriter.

Textured Cardstock Share Is CLOSED!

The Textured Cardstock Share was a success.
We have found homes for over 1700 pieces of cardstock. :)

Thank you, Lee! I really appreciate you hosting this!! ***HUGS***

A Sweet Top Note Treat Holder

Do you have someone that makes your day special? Well here's a quick easy little gift you can give this Valentine's Day to let them know how much they mean to you. :)

My little gift was SUPPOSED to have a mini bag of M&Ms inside, but they have come up missing....hmmmm... I would pretend to be surprised, but when my husband smiles at me, I can see his sweet tooth. LOL


Recipe:
Cardstock: Whisper White, Choclate Chip, Real Red (punched hearts)
Stampin' Write Markers: Chocolate Chip, Real Red
Stamps: Matchbox Messages
DSP: Sending Love Specialty Paper
Accessories: Heart to Heart Punch, 1 1/4 & 1 3/8 circle punch, white grosgrain ribbon, dimensionals, 2 way glue, Dazzling Diamond glitter, sticky strip (to make the pocket inside) and MOST IMPORTANT----CHOCOLATE~~

***When I make these little holders, I run two pieces of Chocolate Chip CS and 1 piece of DSP through my Big Shot using the Top Note Die all at once.
Then I cut my DSP Top Note in half and trim on the perforated line.

Sweet Pea Birds' Nest


You just can't have all those Sweet Pea Birds loose in your Stampin' Room--Oh no!
They needed a 'nest'...a Sweet Pea Birds' Nest. LOL
I made a quick little box for the cards using a piece of the leftover DSP & cardstock.
The dimensions for the box are 3 1/4" wide x 1 1/2" deep--just in case you ever have
Sweet Pea Birds in your Stampin' Room. :)
Nest Dimensions:
4 1/2" x 10 1/2"
On the 4 1/2" side score at 3" (the 3" portion is the sides of your box, the 1 1/2" portion is the flaps.
On the 10 1/2" side score at 1", 2 1/2", 5 3/4" and 7 1/4"
**** IF you want to put envelopes in your nest you will need to make it just a smidge wider. :)

Sweet Pea Birds

At first glance, I loved the new Sweet Pea DSP Stack. There are so many cute sheets in it that just beg to be made into cards. However, there were these two sheets of silly birds in the stack that had LONG legs that stretched the entire length of the 12 x 12 sheets. How do you make a card out of that? You shorten their legs a bit and make adorable 3 x 6 cards out of them!!

These little cards are so much fun!


In total, I made 8 Sweet Pea Bird cards. (There are only 7 cards pictured above, but I did make 8--one was camera shy I guess). I cut the two sheets in half hortizontally and used the top portion (which had the birds) to make my cards. I cut little pieces using bottom of the leftover DSP to make the little houndstooth border--you can see it on some of the cards above. What is exciting to me is that out of the 2 sheets of DSP, I have a piece that is 6 x 6 and another piece that is 12 x 6 leftover to make other cards with. So if you are like me and a little stingy with your DSP--3 x 6 cards are great. A little DSP--A LOT of cards!

AND...Stampin' Up!© sells the little envelopes these cards fit inside. :)
#107286 Small Open-End Envelopes--Whisper White

Tuesday, January 26, 2010

Cardstock Share UPDATE- We need your help to close out this share!

Here's a little update as to how much is still available and where everybody's at for this share.
As of now, this is the amount of each color that we have remaining- See this post for the all the freebies you get by helping Lee and I with this share :)

Chocolate Chip, Close to Cocoa, Summer Sun, Pumpkin Pie, Ruby Red, Garden Green, More Mustard and Not Quite Navy have all sold out.

Creamy Caramel has 1 left
Really Rust has 1 left
Cameo Coral has 3 left


Don't forget if you order $50 or more to add in your SAB sets!! :)

Monday, January 25, 2010

Cloudy Day Masculine Card

This card is for Mary Jo's SCFC1 Challenge. I found a great card by Wendy Weixler using this great sketch that I have seen around a lot lately. I took a VERY FEMININE card that Wendy made and turned it into a VERY MASCULINE card of my own.

The funny thing is that Wendy's card attracted me, because it used the Inspired by Nature stamp set and pink. However, I decided that it was time for me to move away from the flower (did you notice I just used the grass in this card???) and pink for at least one card. You are bound to see them again--just warning you so you are prepared! :)
This card is so outside my comfort zone. #1 it is masculine -- I tend to shy away from them.
#2 I used an aquawriter and did a little watercoloring for the grass. I tend to saturate my paper and make a mess. I admit my cardstock was WET, but I have grass! AND...did you notice my clouds? I have seen Gretchen make BEAUTIFUL cards using her handmade cloud template. My clouds and template need some work, but I was pleased w/ my first attempt at making clouds. :) Whew! I'm tired... this card caused me stress... LOL
I really liked how it turned out though and I hope you do too!
Here it is:
Card Recipe:
Stamps: Nature Silhouettes, Inspired by Nature
Cardstock: Bordering Blue, Old Olive, Chocolate Chip and Whisper White
Ink: Bordering Blue, Old Olive and Chocolate Chip
DSP: Old Olive
Accessories: Chocolate Chip grosgrain ribbon, aquawriter, my cloud template (scallop oval punch in this case), dimensionals and a sponge

Thursday, January 21, 2010

Baby Girl Overalls

I love all things pink and girly. I'm sure you've noticed if you follow my blog at all. I loved the challenge this week from LateNightStampers. The challenge was to use this super girly birthday cake as inspiration to make a card. I was just giddy--all those stripes, polka dots and pink. YEA! LOL

But seriously--what little girl gets a cake like this? And how on earth could you cut it??


Here's my baby girl overalls. I just love them--couldn't you see a little girl running around in them?


Recipe:

Cardstock: Regal Rose, Certainly Celery, Barely Banana

DSP: Certainly Celery

Accessories: Cupcake (die cut), signo white gel pen, small tag punch, 1 1/4" square punch, 1 1/4" circle punch, rhinestone brad, dimensionals


This is my template: I would love to be able to share it w/ all of you, but I don't have photoshop or anything like that....I do everything with paint. :( If you have any suggestions please email me or leave a comment.


Wednesday, January 20, 2010

It Calls to Me...

Use me! UsE mE! USE ME!!!
'IT' is the Inspired by Nature stamp set in the IB&C.... I can't seem to stay away from this set. It has been dusty up on my shelves for a LONG time. Now that I have it down and dusted off, I can't leave it down. I love it! This set is one that will never be sold or traded. It has earned it's place on my shelves.... :)
The cards are QUICK and EASY--I made them while Evan was napping today.


Stitched Felt Flowers

My naked little felt flowers from a few days ago got a makeover tonight. NOW I remember why I saved all that DMC floss from the 1990s---to stitch felt flowers. :) It took me awhile to decide what I was doing and I ripped out as many stitches as I put in, but I'm pretty satisfied w/ my first attempts. They aren't fancy nor are they elegant--they are just kinda cute....
I think I will try tulle, glitter and maybe more bling on future flowers when I get a little more brave.


This is my pink and green combo....


Now I stacked them up and added some floss to the button...


I can't wait to use these!!!I absolutely fell in love w/ the red and gray (although it looks like chocolate and red which would be another good combination).


Isn't it neat?

Tuesday, January 19, 2010

Earth Elements TEXTURED 12 X 12" Cardstock Share

Here's an update on what is still available.
For more information scroll down to the original post or click here to see it.

1. Chocolate Chip SOLD OUT
2. Close to Cocoa SOLD OUT
3. Creamy Caramel (4 packages left
4. More Mustard (3 packages left)
5. Pumkin Pie SOLD OUT
6. Really Rust (4 packages left)
7. Ruby Red SOLD OUT
8. Cameo Coral (3 packages left)
9. Summer Sun SOLD OUT
10. Garden Green (1 packages left)
11. Not Quite Navy SOLD OUT

Lee's email address:inkartfromtheheart@sbcglobal.net
Lee's phone number: 330-745-5716

Monday, January 18, 2010

Inspired Sympathy Card

This morning, I need a quick sympathy card to send out. I went downstairs and looked at my little card that I made yesterday and thought that it would be perfect for a sympathy/thinking of you card.

I bumped up the size to an A2 size, switched the pearls to the right side, used a sponge dauber to apply Pretty In Pink ink to the edges, put in a little scallop edge border and added a sentiment.

On the inside of the card, I changed the sentiment, sponged the edges and added a little Old Olive DSP border along the bottom.

Sunday, January 17, 2010

Felt Flowers

A couple sheets of felt, an SU! Flower Die (in this case, Flowers Layers #3),some pretty buttons, a few minutes and WAH-LAH!! My own little felt flowers to add to my projects. :)
Have I mentioned I LOVE my Big Shot?!! The options are endless.....

Simple Thank You

Recently, Ann Fitton sent some really cute die cuts. There was one little Chocolate Chip Scallop Square card. I thought it was so cute and wanted to make a little card. Today, I had a little while to stamp and came up w/ this Simple Little Thank you Card. I didn't want anything flashy or difficult. I wanted something that was Clean & Simple (CAS).

Last week, I was noticing all the 3"x3" cards that everyone was making and I wasn't sure what to do with them... I received a lot of emails that told me that I NEEDED to jump on the bandwagon and make some of these little cuties. While this isn't exactly a 3"x3" it isn't a traditional A2 size that I usually make...
I see many little cards in my future.

Here's the Outside:


Inside:


Card Recipe:
Stamp Sets: Inspired By Nature, Thank You Kindly (FREE during SAB qualifying purchase) :)
Stampin' Write Markers: Chocolate Chip, Pretty In Pink, Old Olive
Cardstock: Chocolate Chip, Old Olive, Whisper White
Ink: Chocolate Chip
Accessories: pearls, Big Shot, Scallop Square

Stamps For Trade or Sale

Shipping Not Included in Prices:$4.95 first set--$1.50 each additional set

I will take paypal, personal check or money order
Paypal: stampinfool@tds.net

Wendy Hawkinson
5546 Everson Road
Blanchardville WI 53516

For Trade:Boho Backgrounds (NEW Unmounted)
Out of the Box (New Unmounted)
Season of Simple Grace (New Unmounted)
Leaf Lines (New Unmounted)
Fun & Fast Notes (Mounted 2 stamps)
Holy Triptych
Wanted (New Unmounted)
True Friend

For Sale or Trade (for current SU! Products)
Trees Three (New Unmounted) $15 PENDING
A Little Birdie Told Me $12
Festive Favorites $12
Handmade w/ Love (angel policy) $4
Handmade w/ Love 2 (angel policy) $4
To Have & To Hold $12 SOLD
Darling Dots (New Unmounted) $8
Fish Frolics $25
Sweet & Sassy $10
Walk This Way $10
Bundled In Love (New Unmounted) $22
Moose You (New Unmounted) $12
Treat Yourself $18
Zoofari (New Unmounted) $15
Bunny Hugs $10
Backyard BBQ $16
Fun in the Sun (New Unmounted) $25
Sparkling Summer $15
Background Stamps:
Soft Swirls $12
On the Spot $12
Paisley $12
Swirls $12
Baroque (New Unmounted) $12
Happiness (New Unmounted) $12 If you wanted it mounted individually I will check but I'm pretty sure I have the blocks (extra shipping)
Crosshatch $12


Items I would like to trade for: Sweet Pea Stitched Felt
12 X 12 cardstock
½” polka dot grosgrain (in-colors)
Satin ribbonStriped grosgrain (old olive or so saffron)
Varsity Numbers
For All You Do
Greenhouse Garden
Family Phrases
Nursery Letters (jumbo wheel)
Look Who’s TurningOn a Pedestal
Totally Tool
Animal Crackers
Build a Roo

Big Shot Die:Bitty Box & Envelope
Box #2
Bag w/ Scallops
Baskets & BloomsFancy Favor
Pillow Box
Petal Card
Scallop Circle #2
FlowerDaisies #2
Heart Set

Saturday, January 16, 2010

Little Girl Birthday Card

I took a few days off stamping to get ready for the big trip to Cascade Mountain snow tubing/slumber party. I have had a housefull of excited girls for the last 18 hours. I sent them w/ our church group tubing and I came back home w/ Evan. Oh well... I missed out on tubing, but I got to stamp and spend the afternoon w/ my little guy. Hmmmm...did I really miss out? LOL I know the girls are in good hands and having fun and so am I. What a great day! :)


Card Recipe:

Stamps: On your Birthday
Cardstock: Pumpkin Pie, Pretty in Pink, Chocolate Chip, Whisper White
DSP: Sweet Always (retired) A current DSP that would be great is the Sweet Pea Speciality Papers in the Occasions Mini
Punches: Scallop Circle and 1 1/4" circle punch
Accessories: Big Shot, SU! Two Tags die, Pumpkin Pie 1/4" grosgrain, SU! Perfect Polka Dot Impressions Folder, Sweet Pea Stitched Felt

To attach my squares, I used the XYRON 150. It's just a little X and it makes stickers. I didn't know I needed it (MANY MANY YEARS AGO) until my friend, Wendy told me it was very useful. She never steers me wrong. *wink*

Textured Cardstock Share--Free Hostess goodies giveaway!

Lee Bradford was so nice to help me out by hosting an Earth Elements Cardstock Share.

This Share would benefit you if:
* You are a demonstrator teaching classes or having camps where you need several sheets of one color Textured Cardstock. This would be an inexpensive way to stock up.

*You are a Scrapbooker that is making an album and wants the base color of your layouts to be the same color.

* You are a Cardmaker and like to make odd sizes of cards or want to the base and mats of several cards to be the same colored textured cardstock.

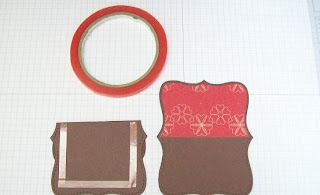
* If you own the Big Shot Bigz XL Dies. The textured cardstock is nice especially for the boxes!

Here's the information (copy and pasted) from Lee's Blog....
Give her a shout if you are interested!

Announcing: Textured 12x12" Cardstock Share

12x12” Textured Cardstock Share – Earth Elements Family
As many of you know, SU! Only sells this product in packs of assorted cardstock. A fellow demonstrator, Wendy Hawkinson, has an eager customer that needs 125 sheets of only Old Olive for her wedding invitations. I gave her a suggestion that she really liked and she asked me to offer it to all of you! If you would like to order a pack of Textured 12x12” cardstock (all one color) in one of the remaining 11 Earth Elements colors listed below, then this product share is for youJ I will have 5 packs of each color available, so choose as many as you wish!
FREE Stuff available for everyone!!!
Every order will be eligible to earn FREE Hostess Sets or SNAIL refills!
· Highest number of packets ordered wins– Level 3 Hostess Set (your choice!)
· 2nd Highest number of packets ordered wins– Level 2 Hostess Set (your choice!)
· 3rd Highest number of packets ordered wins- Level 1 Hostess Set (your choice!)
· Free SNAIL Refill for every 2 packs ordered
· Every order of $50 product gets one free SAB Item of your choice!
Cost
Per packet : $11.95 (I pay for shipping and tax to SU!)
Shipping to you:
· $3.00 1st pack (this covers the cost of the $1.00 box needed to send uncut 12x12” c/s).
· $2.00 for each additional pack.
Order Deadline: Check or Money orders for the full amount of the order made out to Lee Bradford must be received by 1/27/10.
Lee Bradford
170 3rd St. SE
Barberton, OH 44203
Call or email to check status of order and delivery date: mailto:inkartfromtheheart@sbcglobal.net or 330-745-5716. I will post updates of colors no longer available on my blog daily. http://www.inkartfromtheheart@sbcglobal.net/
Email me with your choice of color(s), number of packets total, your mailing address, phone number (in case I have questions about your order), and SAB choice if ordering $50 of paper.
1. Chocolate Chip SOLD OUT
2. Close to Cocoa (1 package left)
3. Creamy Caramel (4 packages left)
4. More Mustard (3 packages left)
5. Pumkin Pie SOLD OUT
6. Really Rust (4 packages left)
7. Ruby Red (2 packages left)
8. Cameo Coral (3 packages left)
9. Summer Sun SOLD OUT
10. Garden Green (2 packages left)
11. Not Quite Navy SOLD OUT

Saturday, January 9, 2010

Chilly Willy's Mittens


A while back, I posted Chilly Willy and several people asked me how I made him--especially his mittens. While his other mittens were cute, I found that they were IMPOSSIBLE to recreate consistently. I tried. I got frustrated. I went back to the drawing board and came up w/ these little guys. Let me introduce you to Willy's Friends.....Tilly, Milly and Billy. :)


Card Directions for Chilly Milly:


Basic Black Cardstock 4 1/4 X 11 folded in half for the base of the card.
Round the top corners w/ the 3/16" Corner Rounder Punch.
Whisper White Top Note
2- 3/4" Basic Black circles (eyes)

1-Pumpkin Pie large oval folded in half (beak)

2-Basic Black large ovals (wings)

1-Pumpkin Pie curly label cut in half (feet)
1-Old Olive large oval cut in half (mittens)
2-Real Red word windows (mitten cuffs)
I held these on the VERY edge and reinserted them back into the word window punch one at a time and made them smaller.
2-Real Red scallop ovals (muffs)
I did the same thing as the with the cuffs. I reinserted them back into the punch. I held them by the very edge and made them smaller.
I used the Signo gel pen to make her little penguin eyes sparkle and decorate her mittens.
I used pop up glue dots and wire to finish off her muffs.
To make his muffs:
Curve your wire and lay it down where you want it.
Put a POP UP glue dot over the ends of the wires where the muff will go.
Add the muffs; push them down slightly so they stay put on the glue dot.


Tuesday, January 5, 2010

Top Note Boxes

I remember being a little girl and my mom would get the most beautiful boxes filled with chocolate for Valentine's Day. I loved it when my stepdad would get a fancy little box of chocolates w/ about 4 chocolates in it too. Well...I love chocolate and they were gone in no time, but I kept that little box and put my cherished little treasures in it. Today, I made little boxes for my girls. Granted, they aren't Russell Stover but rather Stampin' Up!©. :)
I hope my girls feel as special as I did w/ my little fancy box....


Dani's box:

She isn't quite as girly girl as Riley Kate so NO PINK for her.....
rather Always Artichoke and Mellow Moss. :)


Riley Kate's box:
Pretty In Pink and Certainly Celery


If you are interested in making Top Note Boxes, I found this great tutorial:

http://www.thesunsethouse.com/2009/04/14/tutorial-top-note-die-box/

Ghirardelli Valentine

Knowing that Riley Kate LOVES giving gifts is something that I take pride in. She would give a stranger her last dollar if she thought they needed it. That's why we REALLY have to pay attention when her big sister, Dani says she needs something. It's usually, "Mom, can we go to town? Dani needs...." Dani is the typical big sister---she'll take what Riley gives. :)


At all the major holidays, Riley Kate wants to bring treats or trinkets for EVERY classmate, all the teachers she sees throughout the day, the bus driver, the high school and elementary secretaries, the little girl that sits by her on the bus, the principal--the list seems to get longer with every holiday. This year, I'm making Valentines that hold Ghirardelli chocolate. They were such a big hit as stocking stuffers, I just changed it up a bit for Valentine's Day. (Also, Ghirardelli Chocolates go on sale the day after Christmas and I stocked up! LOL)


It's not fancy, but when you put it with a big smile and a hug from Riley Kate--it's PRICELESS!


Now this mom better go get busy--Valentine's Day is only a month away. :)


Ghirardelli Holder Dimensions :
2 3/4 X 9 5/8 score @ 2 3/4, 3, 6 1/4 and 6 1/2

Project Recipe:
CS: Real Red and Whisper White
Ink: Real Red
DSP: Sending Love Speciality Paper (Occasions Mini)
Stamps: I {heart} Hearts (Occasions Mini)
Punches: Full Heart and Heart to Heart
Ribbon: 1/2" Striped Real Red Grosgrain Ribbon

And The Winner Is....


Congratulations, Sandi Dailey! You won my blog candy. My daughter, Riley picked a name this morning and it was yours. :) Yea! WOohoO!

Sandi, if you would have been here at 6:30 am, Riley probably would have thrown confetti and did some singing for you too. LOL... I love letting Riley help with these things--she REALLY LOVES giving presents.

Thank you everyone for coming to visit my blog and celebrating my first 10,000 visitors. I hope ya'll come back often and see what I have stamping here in Wisconsin.

Hugs,

Wendy

Saturday, January 2, 2010

Masculine Gift Card Holder

I needed some masculine gift card holders for some upcoming birthdays. I have seen the pocket in the middle of the card using the Word Window Punch and I thought they were brilliant and had to make one. I am so grateful that there are Stampers out there that love to create templates for me to use. :)


Here's the outside of the Gift Card Holder:


And the inside:


Gift Card Recipe:


Stamps: Enjoy Every Moment
CS: Soft Suede, Whisper White, Handsome Hunter
Ink: Handsome Hunter and Soft Suede
DSP: Thouroughly Modern
Accessories: Word Window Punch, 1" Circle Punch, Paper Piercer and Mat Pack, Dimensionals, bone folder (scoring) and gold brads.


Gift Card Directions:


One piece 4" X 12" DSP scored at 4", 6" and 8" (Fold on score lines so that it makes a mountain in the center)


Using your gift card as a guide, place marks on both sides of the card for where you should punch the opening. Punch in between your marks with your Word Window Punch to create a slit for you gift card to slide in to.


One Piece 4 1/4" X 8 1/4" coordinating CS folded in half to make the base of your card. Unfold and tape your ribbon to the INSIDE of your card. (Make sure that your ribbon is long enough to tie a nice bow. lol...guess why I added this?!)


Adhere your DSP to cover the ribbon.


Now decorate as desired.....


That's it! :)


Friday, January 1, 2010

And You Thought Christmas Was Over....

It almost is....I promise! We have Christmas with my husband's family on Sunday. This is the first time that we have been able to get my husband and all of his 4 siblings to his parent's house to celebrate.
We play the 'White Elephant' game and bringing little gifts is part of the fun. I made trail mix and decorated jars for the girls to take.


I'm especiallly fond of Riley's jar.... it's Pink Pirouette and Kiwi Kiss (retired In-Colors). I love pink and green!


Trail Mix:
Mixed Nuts
Raisins
M&Ms
Chocolate Chips

Jars:
DSP: Ski Slope (retired)
Accessories: Gold Cord, Pink Pirouette and Kiwi Kiss (Retired)
Ink: Kiwi Kiss and Baja Breeze
Stamps: Delightful Decorations


CASE ALERT:
These little chocolates I found at Walmart after Christmas for 50 cents. I was very excited. My youngest daughter, Riley can tell you if you ask her. LOL I had seen these little guys on SCS and fell in love w/ them. Kathleen Hopperstad is the original poster of the Polar Pals.

I stamped them all in Chocolate Chip--they are CHOCOLATE! :)


North Pole Pals Recipe:

Stamps: Cold & Cuddly (I will be sad to see these go!)

Ink: Chocolate Chip

Stampin' Write Markers: Chocolate Chip, Pumpkin Pie and Real Red

DSP: Merry Moments

CS: Garden Green, Very Vanilla and Chocolate Chip

Accesories: Scallop and 1 3/8" Circle Punches, Scallop Border Punch

10,000 Visits--Isn't that SWEET?!

This little blog was started the very end of May 2009. Honestly, I never expected 500 visitors to come to my blog-- yesterday, I reached 10,000! Isn't that amazing?? Thank you! Never in my wildest dreams did I expect so many stampers to visit to my blog.

I have been having a great time sharing my stamping projects (and a little bit of my family) with you over the past few months. Thank you for stopping by and all the nice comments on my cards and projects--they make my day!!


Anyway, I think 10,000 visitors deserves a little BLOG CANDY! :)

My blog candy includes:
An 8 1/2" X 11" package of real red cardstock,
An unopened roll of real red 1/4" grosgrain ribbon &
A new unmounted Garden Greetings set


Just leave me a comment w/ your name and email address in the comment box and I will have my daughter, Riley-Kate randomly pick a number on Jan 5th to choose the winner.


Hugs,

Wendy

Related Posts Plugin for WordPress, Blogger...